Measure around your wrist then add 30% to the measurement (x by 1.3 on your calculator). Decide how wide you want your cuff to be then add 30%.
Lay out your wool horizontally to meet these measurements on a piece of non slip mat. Add a vertical layer, then finally a horizontal layer. I used Finnish wool for my bracelet.
Put a piece of net over the wool, then sprinkle on some warm, soapy water into the centre of your cuffs. gently press through the net so the water spreads to the edges of the wool. Keep gently pressing all over the cuffs.
Gradually increase the pressure as the felt begins to mesh. Carefully peel the net back. Gently flip the cuff over. Fold any untidy edges over. Repeat the same process on this side. Keep going until the felt is firm and the fibres don't pull away. You might need to reheat the water if it cools. You can add more soap through the net as well if necessary. Don't make it too wet and soapy though, or the fibres will float apart.
Once the cuffs are felted, you're ready to full them! This will shrink the cuffs down to size and strengthen them. Put some more hot water on them if you need too. You can mop up any cold water with a towel if there's too much. Roll the bracelets up tightly in the non slip mat with a rolling pin. Wrap this up in an old towel. Roll them backwards and forwards about 50 times. Unwrap, then switch the cuffs round the other way and repeat. Stretch the cuffs out after each bit of rolling and add more hot water if necessary, but be careful not to get it too wet.
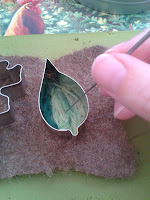
Once your cuffs are down to size and you can stretch them in all directions without any give you are ready for the next stage. I used cookie / biscuit cutters to needle felt leaf designs onto mine.
Once dry you can punch holes into your cuffs and thread with a velvet or faux suede cord.
You can buy these cuffs and more at my website www.apulina.co.uk
If you want to make a felt bracelet without the lace up part, look here http://apulinacrafts.blogspot.co.uk/2013/05/how-to-wet-felt-arm-cuffs-bracelets.html
Apulina


No comments:
Post a Comment