Wednesday, 11 September 2013
Weather tree calendar poster
The weather tree calendar poster is a way of recording the weather daily. You can also use it to record any daily event you like - moon phases, progress towards a personal growth target, weight gain or loss, anything you can think of! You decide on the key and the colours, so how you use it is entirely up to you.
I designed it so the four seasons are divided up along each segment. The animals and plants alongside are specific to the season.
It is great for children to learn about the seasons, weather, maths, dates..... It's just as much fun for adults though.
This is available for pre-order in my shop www.apulina.co.uk . Buy one for yourself to keep a beautiful record of the year. Also makes the perfect gift for any difficult to buy for friends and relatives.
Saturday, 31 August 2013
Miniature needle felted wool animals: fox, mouse, badger
www.apulina.co.uk
Wednesday, 3 July 2013
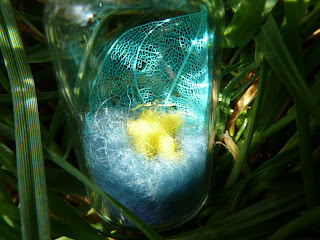
Miniature felt animals in corked glass bottles
Sunday, 9 June 2013
Puppet head / felt doll head
A felt puppet head needle felted over a polystyrene ball. Message me if you'd like to commission a puppet head to your own design.
Felted fox / animal masks
This mask was made using a combination of wet felting and needle felting. I used Finnish, Corriedale and Merino wool, formed over a handmade resist. I am accepting commissions for fox masks and other animals. You can buy my animal masks here
Labels:
craft,
felt,
fox,
fulling,
hand made,
how to,
instructions,
make,
mask,
needle felted,
photograph,
step,
tutorial,
wet felted,
wet felting,
woodland,
wool
Sunday, 26 May 2013
Felted Wool Lace up tie bracelet / cuff with leaf design
Measure around your wrist then add 30% to the measurement (x by 1.3 on your calculator). Decide how wide you want your cuff to be then add 30%.
Lay out your wool horizontally to meet these measurements on a piece of non slip mat. Add a vertical layer, then finally a horizontal layer. I used Finnish wool for my bracelet.
Put a piece of net over the wool, then sprinkle on some warm, soapy water into the centre of your cuffs. gently press through the net so the water spreads to the edges of the wool. Keep gently pressing all over the cuffs.
Gradually increase the pressure as the felt begins to mesh. Carefully peel the net back. Gently flip the cuff over. Fold any untidy edges over. Repeat the same process on this side. Keep going until the felt is firm and the fibres don't pull away. You might need to reheat the water if it cools. You can add more soap through the net as well if necessary. Don't make it too wet and soapy though, or the fibres will float apart.
Once the cuffs are felted, you're ready to full them! This will shrink the cuffs down to size and strengthen them. Put some more hot water on them if you need too. You can mop up any cold water with a towel if there's too much. Roll the bracelets up tightly in the non slip mat with a rolling pin. Wrap this up in an old towel. Roll them backwards and forwards about 50 times. Unwrap, then switch the cuffs round the other way and repeat. Stretch the cuffs out after each bit of rolling and add more hot water if necessary, but be careful not to get it too wet.
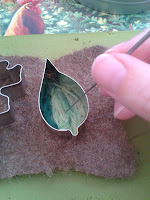
Once your cuffs are down to size and you can stretch them in all directions without any give you are ready for the next stage. I used cookie / biscuit cutters to needle felt leaf designs onto mine.
Once dry you can punch holes into your cuffs and thread with a velvet or faux suede cord.
You can buy these cuffs and more at my website www.apulina.co.uk
If you want to make a felt bracelet without the lace up part, look here http://apulinacrafts.blogspot.co.uk/2013/05/how-to-wet-felt-arm-cuffs-bracelets.html
Apulina
Labels:
bracelet,
craft,
cuffs,
directions,
felt,
fulling,
how to,
instructions,
lace,
leaf,
leaves,
make,
needle felted,
step,
tie,
tutorial,
up,
wet felted,
wet felting
Friday, 24 May 2013
Needle felted tree with woodland animals
First I made a wire frame using copper wire. I then wrapped this with Merino wool and needle felted it around the wire. The leaves are made from a sheet of wet felted green merino wool, cut into shape and needle felted onto the branches.
I shaped a length of wool into the outline of an oval and needle felted this onto the tree to form the Owl hollow.
Next I added the bee and hive and bird nest.
The backdrop for the scene is a wet felted piece.
You can buy my bears and more at my website www.apulina.co.uk
I shaped a length of wool into the outline of an oval and needle felted this onto the tree to form the Owl hollow.
Next I added the bee and hive and bird nest.
The backdrop for the scene is a wet felted piece.
You can buy my bears and more at my website www.apulina.co.uk
Labels:
bear,
craft,
directions,
felt,
fulling,
hand made,
how to,
instructions,
make,
needle felted,
owl,
step,
teddy,
tree,
tutorial,
wire frame,
woodland,
wool
Saturday, 11 May 2013
How to wet felt arm cuffs / bracelets
Then decide how wide you want your bracelet to be and add 30%. I want mine about 6cm, so I make it approximately 9cm. The 30% extra is because your wool will shrink. If you're not using merino wool, check what the shrink rate is.
Cut out two card templates with these measurements and pop them on a piece of non-slip mat. I have two oblongs measuring 13cm by 9cm.
I'm using this poppy design for inspiration. You could make your bracelets all one colour or several different colours. Use anything and everything to inspire you for pattern and colour.
Lay down the first layer of wool. This should overlap by a centimetre or two either end. Try not to go too much over the edge of the template at the top and bottom. I just used the basic underlying colours in this first layer. Repeat for a second layer. In felting you should lie the layers perpendicular to each other. However, because my bracelet is quite narrow, I lay my next layer slightly diagonally so my green doesn't go into my blue.
The next layer I added horizontally. I added some different shades of blue and green to this layer.
Then it's time to add the decoration! I used silk noil to add clouds and red nepps for the poppies.
Once you're happy with your design lay over a piece of fine net (you could also use a piece of dust sheet). Sprinkle some hand hot, soapy water in the middles of your designs. I used a small watering can for this. The idea is for the wool to all be wet, but not so water is leaking out the sides. I do this on my dining table with a waterproof cloth over the top no problem. If you accidentally use too much water just mop it up with a towel. If you use too much water or soap the fibres will just float past each other and not felt.
Gently press through the net and spread the water across the design, except for the edges that go off the side of the template.
Once it's all wet, very carefully peel off the net.
At this stage I added some blobs of red wool and damped them down into the design to make my poppies.
I put some black nepps in the centre of each.
Carefully flip your bracelets over.
Fold down both sides with a bit of water. If you have any overlapping bits at the top and bottom then fold these under themselves. You should still be able to see the card at the top and bottom. This is where your hand goes through.
Repeat all the stages again for the other side.Then fold over the sides. You might have to lift up and reposition some elements of your design where they overlap. I had to pick up some of my poppies and clouds.
Your water is probably quite cool by now, so either reheat in the microwave in a microwaveable container, or get fresh.
Replace the net over the design. Mop up any excess cold water with a towel through the net if you need to and replace with hand hot, soapy water.
Start pressing gently at first though the net. Imagine you're stroking a baby rabbit. If any of your design gets dislodged you can repostition it at this stage.
Gradually build up the pressure of your hands, making sure you pay attention to the sides of the bracelet. Run your fingers down the edge, otherwise you'll end up with thin bits coming off the edge. Turn your bracelet over periodically.
Keep going, this bit takes quite a while. Reheat your water if it gets cool.
Once you can pinch a section of your felt without fibres coming free you're ready for the next stage.
Roll your design up in the non-slip matting with a rolling pin. Then roll that up within an old towel.
Roll the whole thing backwards and forwards about fifty times. Make sure you roll it the whole way from your elbow to your hands to ensure the whole design is under pressure.
You can see here the design is already beginning to shrink from the rolling.
Flip the bracelets around and roll the other way.
After 50 rolls in each direction I removed the card templates. You might have to gently pull apart the top and bottom if any fibres have overlapped here.
Now get some soapy water and rub around inside and on the open edges as these areas may be less well felted.
Then return to the rolling! Keep rolling the bracelets in all different directions. Add more hot water if it gets cool. Make sure you check for sizing as you go, you don't want it to shrink too small.
Once you are happy with the size of your bracelets and you can pull the felt in all directions without stretch you're done.
Rinse the bracelets in warm water then soak in cold water with a dash of white vinegar for about 15 minutes.
Squeeze the water out (but don't wring) then leave to dry.
Your bracelets are finished!
You can but theses cuffs and more at my website www.apulina.co.uk
 Visit my shop www.apulina.co.uk
Labels:
arm warmers,
craft,
cuffs,
directions,
elf,
felt,
fingerless,
flowers,
fulling,
hand made,
how to,
instructions,
make,
poppy,
step,
tutorial,
wet felted,
wet felting,
wool
Subscribe to:
Comments (Atom)


